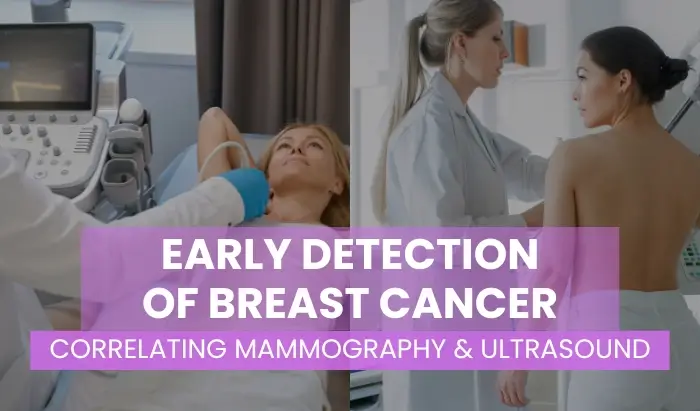
Early Detection of Breast Cancer: Correlating Mammography & Ultrasound


- Introduction
- Some Statistics
- Screening Mammogram
- The Role of Ultrasound in Breast Imaging
- Dividing the Breast into halves
- Measuring Distance From Nipple for Ultrasound Scanning
- Documenting Distance from Nipple
- Correlating Finding with Shape & Posterior Depth
- Conclusion
Introduction
Breast cancer is becoming more prevalent in women under the age of 40. Although the exact reason is unknown, we do know that screening mammograms can save lives through early detection of breast cancer. Statistics show that early detection of breast cancer through mammography and adjunct modalities, such as breast ultrasound, can identify breast cancers before they are palpable. Mammography is the gold standard for early detection of breast cancers of smaller sizes. Ultrasound is also an effective technology for corroborating mammogram findings. When mammogram and ultrasound findings are well correlated, the likelihood of detecting breast cancers as small as a few millimeters increases. This article explores tips and tricks to help technologists become more confident in their ability to correlate ultrasound findings with mammograms for the early detection of breast cancer.
Some Statistics
- According to the FDA, one in eight women will be diagnosed with breast cancer
- According to the ACR website, one in six women diagnosed with breast cancer will be in their 40s
- Mammography has proven to reduce mortality rate by ~40% since the 1990s
- Some studies have shown that mammography can cut the risk of dying from breast cancer in half through early detection of breast cancer
- Three out of four women diagnosed with breast cancer will have no family history of the disease or will be in the high-risk category


Screening Mammogram
A screening mammogram is recommended starting at the age of 40 for average-risk patients. A screening mammogram is an exam where an asymptomatic patient comes in and has her breasts compressed in two different positions. The first mammogram position is called a cranial-caudal view (CC). In this position, the X-ray beam enters the superior or top portion of the breast and exits the inferior or lower portion of the breast. (Fig 1)
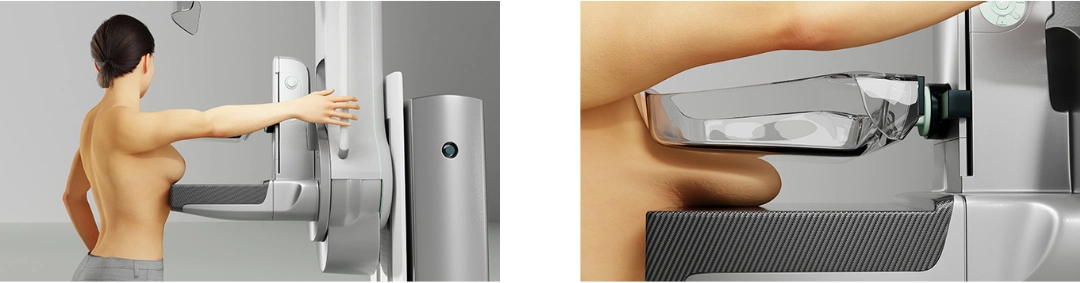 Fig. 1 Patient’s left breast is compressed in the CC mammography position.
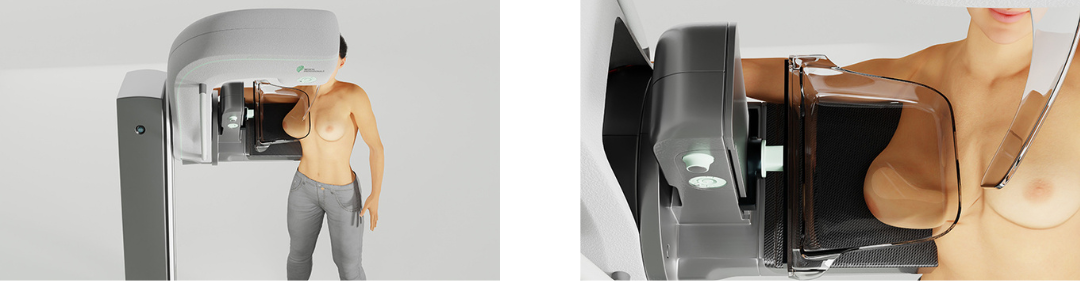 Fig 2. The patient’s left breast was compressed in the MLO mammography position.
The second mammogram position is called a medial-lateral oblique view (MLO). For this view, the X-ray beam enters the medial or inner side of the breast and exits the lateral or outer side of the breast. (Fig 2)
Both breasts are imaged, and the patient is dismissed. The screening mammogram is then read by an interpreting breast radiologist. The radiologist then decides if the mammogram is clear of any suspicious lesions or if the patient needs to be called back for additional diagnostic workup. Part of the diagnostic workup exam, especially when indicated for early detection of breast cancer, can include more mammographic images and possibly an ultrasound for correlation.
The Role of Ultrasound in Breast Imaging
If, after the mammogram, a breast ultrasound is recommended by the radiologist for correlation, it is very important that the technologists or sonographers understand the anatomy of the breast and can correlate the findings between the mammogram and the ultrasound. This is fundamental for the early detection of breast cancer. Although there will be times when a correlation on ultrasound cannot be found, confidence in your correlating skills will also boost the radiologist’s confidence in the sonographer’s findings.
Below are some images of a bilateral 2D mammogram with both mammography views (Fig. 1). The radiologist can choose to arrange the images in whichever way best suits their reading style. It is important to know which side is the right breast and which side is the left breast. (Fig 3)
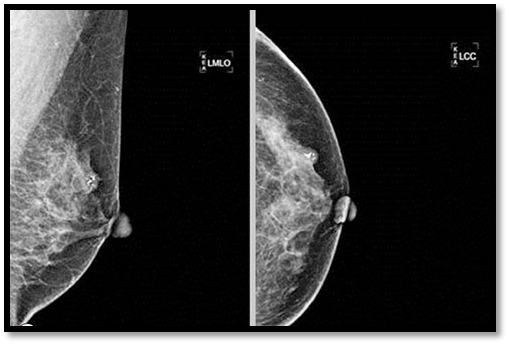 Fig. 3 Bilateral Mammogram. 4 views, 2 images per breast.
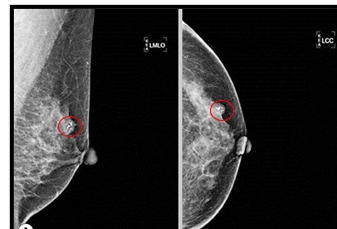
The mammogram images should be marked to show the area of suspicion that needs further workup. (Fig. 4)
Fig 4. Left breast images with the area of concern circled for further diagnostic workup.
Dividing the Breast into halves
The first step the technologist needs to be able to do is divide the breast into halves when looking at the CC view and the MLO view. The technologist needs to keep in mind that the line goes directly posterior to the nipple to the edge of the mammographic image on the CC view, and on the MLO, it goes directly posterior to the nipple up at an angle to meet the pectoralis muscle or edge of the image. Once this is done, we can see the lateral half and the medial half on the CC views. And the superior half and the inferior half of the breast on the MLO views. If the mammographic finding is on both the CC and the MLO, the technologist can now pinpoint which quadrant to begin their ultrasound scanning. (Fig. 5)
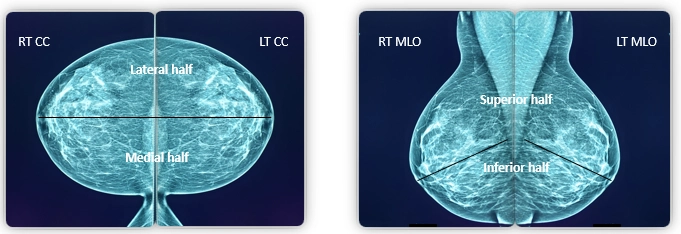
Fig. 5 Both breasts are divided into halves. The line goes directly posterior to the nipple to the edge of the film on the CC view, and on the MLO, it goes directly posterior to the nipple up at an angle to meet the pectoralis muscle or edge of film.
In this example, the suspicious lesion is circled on the mammogram images’ left CC and the left MLO. Once we draw the lines to separate the breast into halves on each image, we are now able to see that on the MLO, it is on the upper half of the breast, and on the CC, it is on the outer half of the breast. Therefore, this lesion should land in the upper outer quadrant of the left breast (Fig. 6). If the lesion was only circled on one of the views above, such as the upper portion of the breast on the MLO, then the sonographer would use ultrasound to scan the upper half of the breast. If the suspicious lesion was only seen on the CC view, then the sonographer would use ultrasound to scan the whole outer half of the breast. 3D-mammography can also be helpful when correlating mammography to ultrasound with one-view findings, if this is available in your facility. Again, these steps are rudimentary in the early detection of breast cancer.
 3D mammography Fig 6. Left breast images with the breast divided in half. On the MLO, the lesion is on the upper half, and on the CC, the lesion is on the lateral half of the breast.
Measuring Distance From Nipple for Ultrasound Scanning
To be even more precise, when scanning with ultrasound, you can measure on your PACS system from the nipple to the lesion, either superior or inferior, on the original MLO and one-view medial or lateral on the original CC view mammograms. In this example, we measure 3cm from the nipple to the lesion superiorly on the MLO and from the nipple to the lesion laterally on the CC view (Fig. 7). Keep in mind the mammogram images are of the breast under compression, so the measurement can be slightly off. If you do this exact measurement on the patient, you can be more confident with the placement of your transducer to begin your ultrasound scanning.
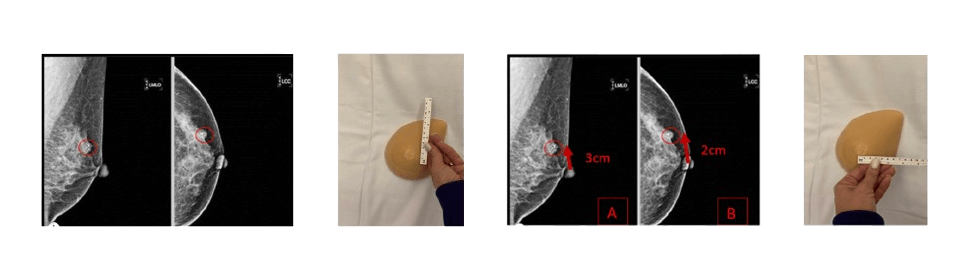
Fig. 7: Measuring on the PACS image and on the patient’s breast: Nipple superior to the level of the lesion (3cm) | Nipple lateral to the level of the lesion (2cm)
Documenting Distance from Nipple
If a lesion is found, the sonographer should take a marker and put a dot in the middle of the transducer on the patient’s breast (Fig. 8). A measuring tool should be used to measure the true distance from the nipple to the lesion radially (Fig. 9). This is the true centimeters from the nipple. This is what should be documented on the correlating ultrasound images.
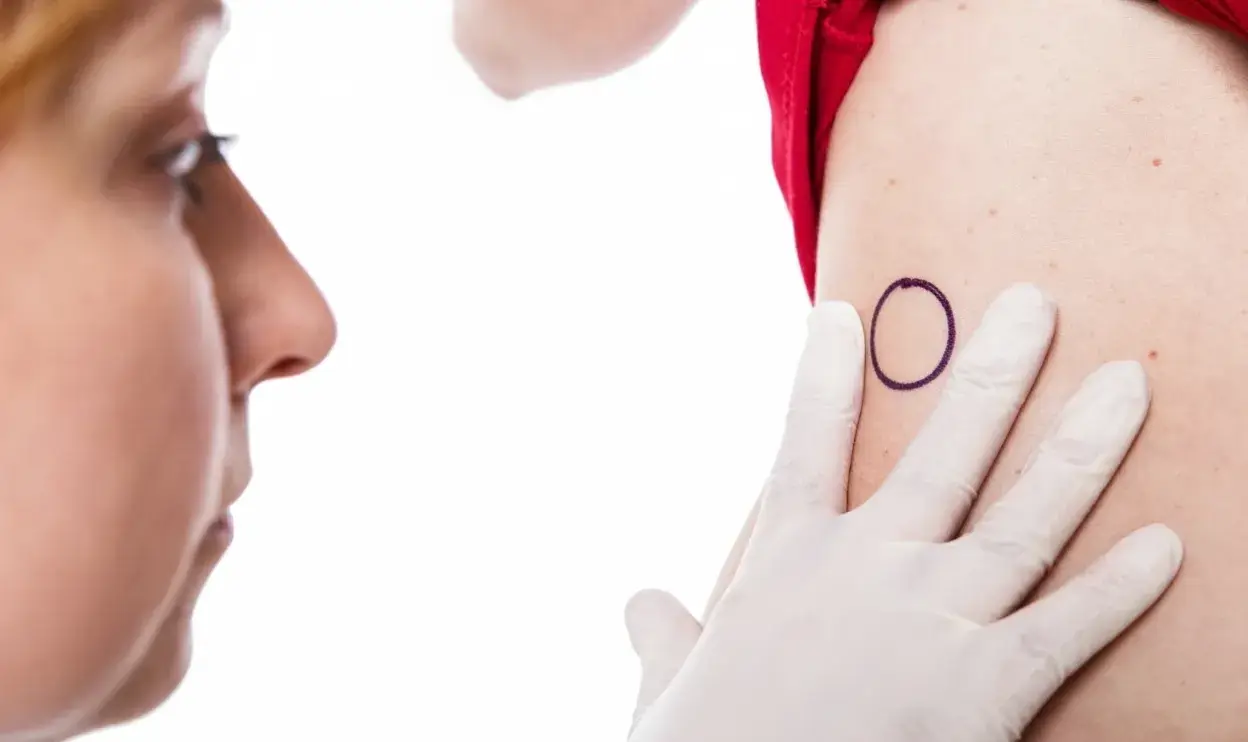 Fig. 8 Place a dot in the middle of the ultrasound transducer on the patient’s breast.
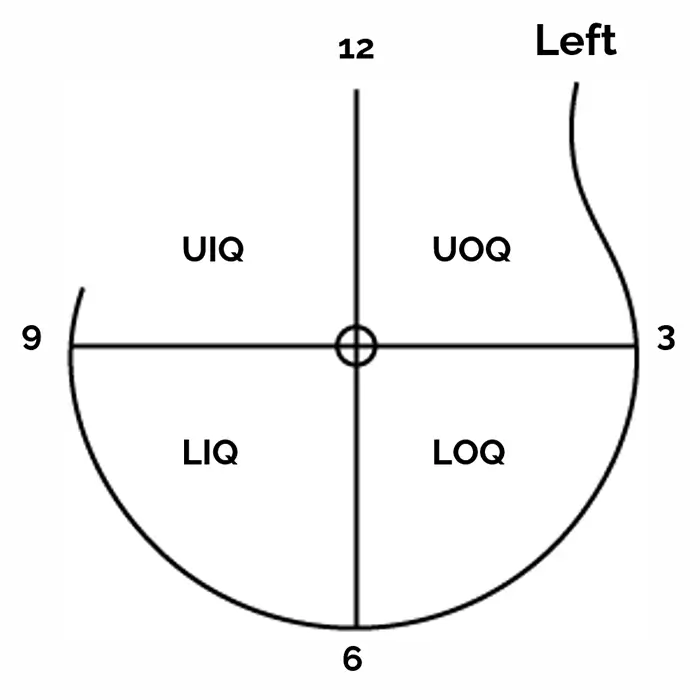 Fig. 9 Measure from the nipple to the dot.
I can’t impress upon my fellow sonographers how important it is to be accurate when documenting the distance from the nipple and the o’clock position on your ultrasound images for early detection of breast cancer and other types of pathologies (Fig. 10). We want to be as precise as possible. If the patient goes to another facility for a recommended procedure and they need to replicate your correlating ultrasound images, inaccurate documentation can cause confusion (especially if there is more than one lesion and they are close to one another) and cause the patient unnecessary anxiety. If a correlating lesion is not found, the approximate area in the quadrant should be documented with negative ultrasound images.
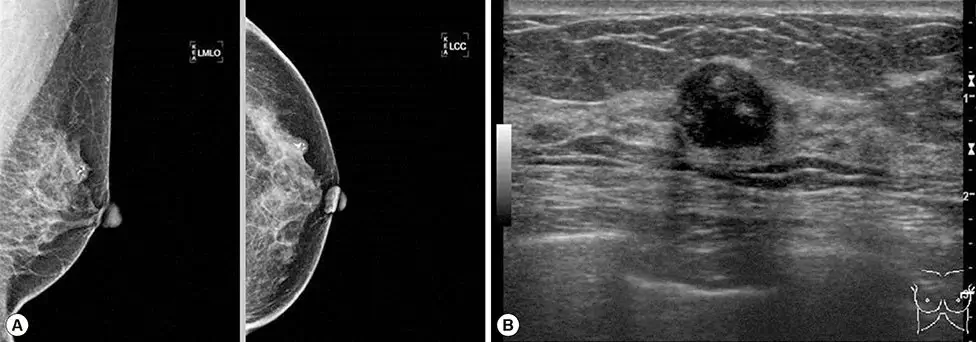 Fig. 10. It is very important to document the precise o’clock and distance from the nipple on the ultrasound image.
Correlating Finding with Shape & Posterior Depth
The last step in assuring you are locating and correlating the correct lesion on the mammogram with the ultrasound is looking at the shape and posterior depth on the mammogram images vs. the ultrasound findings. If the lesion on the mammogram is spiculate, the correlated findings on ultrasound should be irregular and have angular margins. A round or oval lesion should be round or oval on ultrasound imaging. If a lesion mammographically is surrounded by glandular tissue, then the correlating lesion on ultrasound should be surrounded by glandular tissue. (Fig 11)
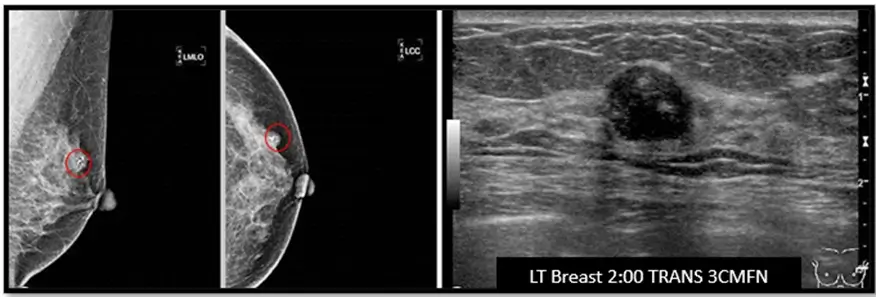
Fig. 11 – Lesions in mammogram images are partially surrounded by glandular tissue | The lesion in the ultrasound image shows the lesion partialtly surrounded by glandular tissue, and also in the anterior 1/3 of the image.
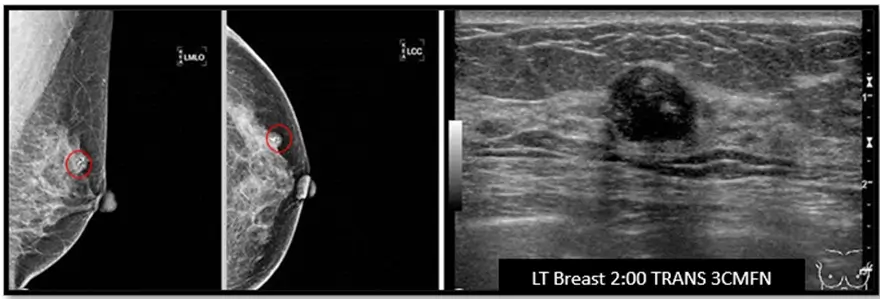 Fig. 12 Posterior depth measured on the mammogram and the ultrasound. There may be some slight differences since the breast is spread anteriorly on the mammogram and posteriorly on the ultrasound.
The posterior depth on the mammogram is easier to see since the whole breast is spread out anteriorly. Posterior depth on ultrasound is still relevant but can be slightly different since the patient is supine and the breast tissue is spread out posteriorly. (Fig. 12)
Conclusion
In conclusion, the rising prevalence of breast cancer underscores the critical importance of early detection of breast cancer. Screening mammograms and adjunct modalities, such as breast ultrasound, play a vital role in identifying cancers before they become palpable. By enhancing technologists’ skills and confidence in correlating ultrasound findings with mammograms, they can significantly contribute to the early detection of breast cancer, and therefore have a trusting relationship with your interpreting radiologist, ultimately saving more lives!
Disclaimer: The information provided on this website is intended to provide useful information to radiologic technologists. This information should not replace information provided by state, federal, or professional regulatory and authoritative bodies in the radiological technology industry. While Medical Professionals strives to always provide up-to-date and accurate information, laws, regulations, statutes, rules, and requirements may vary from one state to another and may change. Use of this information is entirely voluntary, and users should always refer to official regulatory bodies before acting on information. Users assume the entire risk as to the results of using the information provided, and in no event shall Medical Professionals be held liable for any direct, consequential, incidental or indirect damages suffered in the course of using the information provided. Medical Professionals hereby disclaims any responsibility for the consequences of any action(s) taken by any user as a result of using the information provided. Users hereby agree not to take action against, or seek to hold, or hold liable, Medical Professionals for the user’s use of the information provided.